Last month in my newzletter, I explained my desire to engage more with my readers who don’t live in my local area. For a variety of reasons, this year has really grounded me to my local community. I exhibited locally this past June and have been focusing on teaching live workshops at a local creative space. My blog posts tends to be more about the mental/emotional aspects of being a creative. I don’t usually show too many how-tos here. I’ve been thinking maybe I should change things up the next few weeks and see how you like some occasional insight into my process.
 So … let’s talk thread painting… one of my favorite things to do. The butterfly image is an example of a before and after of thread painting on a fabric known as “quilters cotton”. Quilters cotton is fairly lightweight and flimsy. And if you’ve ever tried to sew on it, you might notice that it starts to draw-up (pull in). You may even notice that the stitches don’t look very neat. So how do you apply such dense stitches onto this fabric without making a mess?
Stabilizers.
By definition a stabilizer is “a thing used to keep something steady or stable.” With lightweight fabrics we need to add something to the fabric to make the material more “stable” and less likely to draw-up. What’s fun is we have lots of options to choose from.
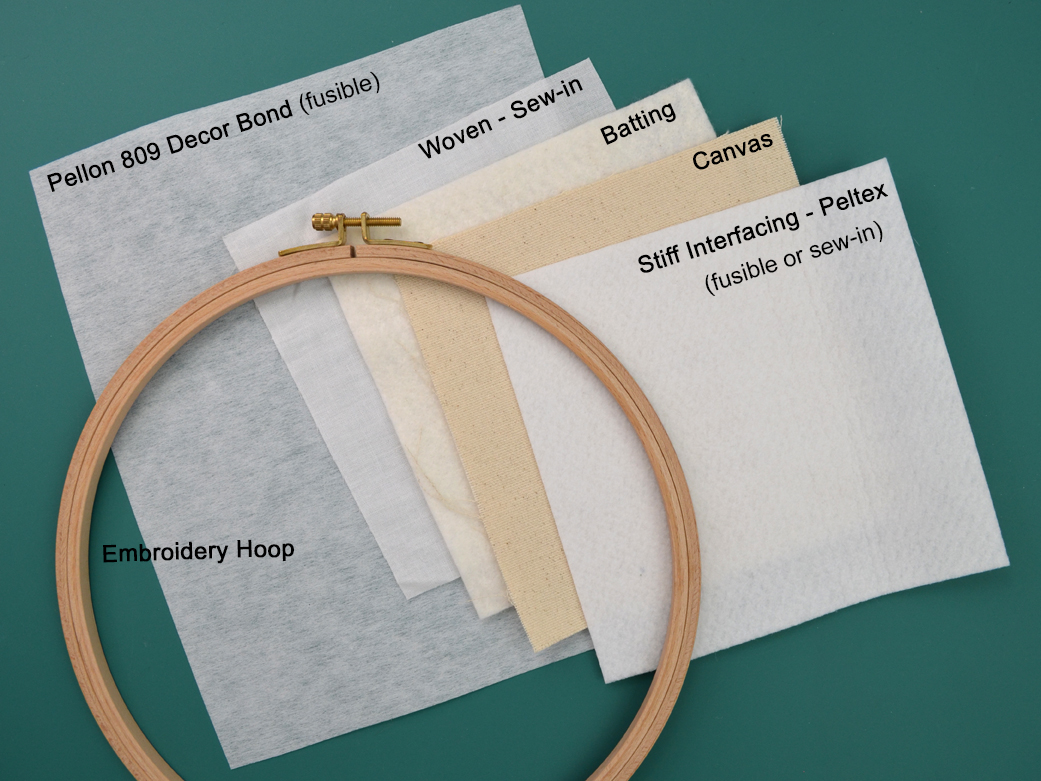
 Interfacing: This material is attached to the back of fabric (or between 2 layers). Most commonly they are used in clothing construction to stiffen shirt collars or cuffs. There are interfacings that need to be sewn in and others that have a heat reactive (fusible) glue on the back that can be ironed in place. Every thread painter has their own preference. My go-to is Pellon 809 Decor Bond (fusible). It’s fairly stiff material giving me plenty of support and I can easily remove the excess material from the back of my work.
_____- Quilt batting: Think of the thread painting as dense quilting. Fuse or pin the batting to the back of your work and stitch. You may get more draw-up with batting than other products, but it has the bonus of creating a 3-dimensional (trapunto) effect.
_____ - Canvas: A dense cloth used for boat sails, tents and painter’s canvases. Needs to be pinned or fused to the back of the fabric and draw-up is very minimal. It’s challenging to remove any excess, so plan to leave it in or add extra to stretch the finished thread painting onto a stretcher bars to make a finished art piece.
_____ - Stiff Interfacing: A very dense, thick non-woven polyester material that does not flatten or distort with steam, example Peltex. Used most commonly for crafts, like purses, fabric postcards, etc. Used when you want a really rigid finished project.
_____ - Embroidery hoops: Yep! just like the ones hand embroiders use. It’s common to find hoops that are 1/2″ thick in the hobby stores. However, the foot of some machines won’t raise high enough to get the hoop under it. I’ve find 1/4″ thick hoops work with any machine. Hoops that are 12″ wide (diameter) work best for most sewing machines. Note: when you use a hoop for thread painting, you want to the fabric in the hoop to be in contact with the bed of the sewing machine. Look at hooped fabric, one side looks like a drum and the opposite side looks like a tray. When thread painting, the tray side is facing up when we stitch.
I always encourage everyone to experiment. Try new materials and look at your results. Which do you like? There’s never one way to do anything.
_____________________________
Want to learn more about thread painting? Take my online on-demand course Paint with Thread to learn how. Learn at your leisure, with unlimited access to the materials.