Take the next step

Its been a busy week working with issues that don’t produce much in tangible outcomes. I plug along, like we all do. Hoping the micro-steps aren’t wasted time and, in the end, the results will feel worth the effort. That’s called having faith.


“Anchor down. I breathe in.
‘Cause we’ve got hope
We won’t be sinking”
– lyrics: “Hope on a Rope” by Red Wanting Blue


Since I have limited time this week, I’ll just reflect that faith is having a conviction to keep going. When the odds seem overwhelming, we keep stepping. We climb the mountain with one-step, then the other. Eventually we’ll reach the top. Don’t give up, don’t stop. Wherever you’re going…the only way to start is to begin. And, the only way to get there is with faith that tomorrow will be another day. Whatever you may be facing today, hold your head high, steady your balance and take the next step.

Be well…


Faux-Float Frames

I received good news in my email today…I was notified that an article I wrote for Quilting Arts Magazine will be in their Summer edition and on newsstands June 14th, 2022.

Over the last few years, I’ve had a number of people asked me how I frame my smaller quilts. I explain it in this article called “Faux-Float Frames for Art Quilts” and now you can read all about my process.

If you don’t have a subscription or local newsstand that carries Quilting Arts Magazine, you can order it here (available mid-June) https://www.quiltingdaily.com/product-category/magazines-ebooks/quilting-arts/

If you read the article, please let me know what you think.

Enjoy!


Try and succeed

I’ve been reading “The Storyteller” by David Grohl (lead vocalist for Foo Fighters). If you followed the “grunge” scene of music, you might appreciate his story. Even if you don’t know about much about grunge, its a good read because it’s a story about David’s creative journey. If you’re reading this you are probably on your own creative journey.

As I’m working through the last few chapters, he’s spending a lot of time reflecting on the people he met along the way. He looks back in amazement that a young kid raised in Springfield, Virginia could be living the life he currently has. Many of his idols and inspiration growing up are now counted as friends. He’s humble about his journey and finds it difficult to believe that he stumbled his way to this success. He wasn’t discouraged because there was a challenge ahead. He frequently refers to his journey as “fake it until you make it.”


I know this sounds like a book review; not, something I usually do. But, I’m telling you this because I see something else in the chapters of his story. I see that he showed up!! He had self-doubt and lack of experience, but he looked at opportunities with courage and tried. That to me is the lesson.

How many times have you felt discouraged and gave up, maybe even before trying? Have you ever said, “I’m not good enough, so why bother?” I can remember a few times I did. I also remember a few times I thought it, then convinced myself to generate the courage and try anyway. It is easy to look back in hindsight at the opportunities where we said “yes.” I see that each one of my “say yes” moments placed me farther down the road. That’s especially true when the opportunity turned into a complete failure!! They taught me what worked and didn’t work, making it easier to move forward to the next challenge.

If we give up, we’ll never completely know what we missed. However, I’m confident that when we say “yes,” we will grow. Its scary to take chances, but if you really want something you should try. This is important step to making art. To learn, we must try and fail. If we accept that, then we’ll only be able to try and succeed.

Roller coaster of life.

Why do we create? I believe it is because we have to. There is an intrinsic drive calling to us. Some don’t feel it as strongly as others. I’m of the latter population; I can’t remember when I didn’t have the calling.

So you create something, then what do you do with it? Years ago, after making so many things and gifting them away, I decided I had saturated my pool of recipients. In order to have another outlet, I decided to make a business from my art and sell my work. Its been a journey of twists and turns with feelings of great motivation and other times great disappointments. This is the path I signed up for.

Art has a way of connecting with people, so I also like to get it seen. Last month I had the honor to send “The Messenger” on a road trip to La Connor, Washington. I was excited packing it up and, after paying a goodly amount on shipping, I sent it on a truck ride across country. The box was suppose to arrive one day before the deadline, … however, it didn’t.

This is the ups and downs of being an artist. While the box was in transit you can’t tell where it is. I kept pulling up the tracking number and … waiting. A couple days after the delivery deadline, I decided to inquire with the shipper. Thankfully, I received a quick response back that the box was safely sitting at the distribution center –  20 minute drive from the museum! They were short staffed and had to wait to send the shipment on to its final destination. What a relief that it was safe, but would it get there in time for hanging?

I can say prior to calling, my worst fears were running through my head. I envisioned the box and quilt destroyed. Or maybe lost or stolen. My anxiety was high. I notified the museum and … we waited.

The thing is we have to have faith that everything will be OK. When my brain moved to worried thinking, I had to pull myself back from the edge by calmly thinking “be patient, it will be ok!”

You can see from the photos that it did make it on time. Deep breath. The lesson learned is hang tight, everything will be alright, this is just another roller coaster of life.


See “The Messenger” at the
5th Annual Birds of a Fiber Exhibit at
Pacific Northwest Quilt & Fiber Arts Museum
Jan 26 – Feb 27, 2022
La Conner, Washington

Never one way to do anything

Last month in my newzletter, I explained my desire to engage more with my readers who don’t live in my local area. For a variety of reasons, this year has really grounded me to my local community. I exhibited locally this past June and have been focusing on teaching live workshops at a local creative space. My blog posts tends to be more about the mental/emotional aspects of being a creative. I don’t usually show too many how-tos here. I’ve been thinking maybe I should change things up the next few weeks and see how you like some occasional insight into my process.

So … let’s talk thread painting… one of my favorite things to do. The butterfly image is an example of a before and after of thread painting on a fabric known as “quilters cotton”. Quilters cotton is fairly lightweight and flimsy. And if you’ve ever tried to sew on it, you might notice that it starts to draw-up (pull in). You may even notice that the stitches don’t look very neat. So how do you apply such dense stitches onto this fabric without making a mess?

Stabilizers.

By definition a stabilizer is “a thing used to keep something steady or stable.” With lightweight fabrics we need to add something to the fabric to make the material more “stable” and less likely to draw-up. What’s fun is we have lots of options to choose from.

  • Interfacing: This material is attached to the back of fabric (or between 2 layers). Most commonly they are used in clothing construction to stiffen shirt collars or cuffs. There are interfacings that need to be sewn in and others that have a heat reactive (fusible) glue on the back that can be ironed in place. Every thread painter has their own preference. My go-to is Pellon 809 Decor Bond (fusible). It’s fairly stiff material giving me plenty of support and I can easily remove the excess material from the back of my work.
    _____
  • Quilt batting: Think of the thread painting as dense quilting. Fuse or pin the batting to the back of your work and stitch. You may get more draw-up with batting than other products, but it has the bonus of creating a 3-dimensional (trapunto) effect.
    _____
  • Canvas: A dense cloth used for boat sails, tents and painter’s canvases. Needs to be pinned or fused to the back of the fabric and draw-up is very minimal. It’s challenging to remove any excess, so plan to leave it in or add extra to stretch the finished thread painting onto a stretcher bars to make a finished art piece.
    _____
  • Stiff Interfacing: A very dense, thick non-woven polyester material that does not flatten or distort with steam, example Peltex. Used most commonly for crafts, like purses, fabric postcards, etc. Used when you want a really rigid finished project.
    _____
  • Embroidery hoops: Yep! just like the ones hand embroiders use. It’s common to find hoops that are 1/2″ thick in the hobby stores. However, the foot of some machines won’t raise high enough to get the hoop under it. I’ve find 1/4″ thick hoops work with any machine. Hoops that are 12″ wide (diameter) work best for most sewing machines. Note: when you use a hoop for thread painting, you want to the fabric in the hoop to be in contact with the bed of the sewing machine. Look at hooped fabric, one side looks like a drum and the opposite side looks like a tray. When thread painting, the tray side is facing up when we stitch.

I always encourage everyone to experiment. Try new materials and look at your results. Which do you like? There’s never one way to do anything.

_____________________________
Want to learn more about thread painting?  Take my online on-demand course Paint with Thread to learn how. Learn at your leisure, with unlimited access to the materials.

Live life to the fullest

My life has been on overload this month. I can’t complain about any of it, but with the past 18 months of not much going on, this month is making me feel tired. Good news is October starts on Friday and I’ll be able to look at September in the rear view mirror and an emptier calendar.

I recently watched a Ted Talk given by Jean Shinoda Bolen. Her discussion of Liminal Time has been heavy on my mind.

Liminal time is a transitional period between events. Bolen focuses on our current transition between pre- and post- covid times. This threshold period between the two life events is called liminal time. Its easiest to understand in architectural terms, as the hallway between two buildings (liminal space). As you walk through the passage way, you transition from one building to the other. Its almost like being in limbo as you walk the corridor. Maybe you even have time to gain strength to face what’s in the next room.

This all resonates with me because I am transitioning again. Pre- and Post- covid for sure, but also soon to hit another milestone birthday. The questions on whether I have I lived my life to the fullest are weighing on my mind. I’m re-evaluating and looking for what makes me happy. What do I enjoy doing vs what I am doing? Its healthy to do regular litmus tests on your life. Check in. Are you happy? What could you change? What needs to stay the same?

My bearded dragon thread-sketch reminds me of the journey of the dinosaurs. Did they realize they were becoming extinct? I doubt it. I bet they lived life to the fullest. And, that’s what I plan to do, too; live life to the fullest.

Little Secret

I have a confession. I sometimes wonder if I’m “cheating” when I make my art. In last week’s post, I shared progress on my newest artwork (a red-shouldered hawk). I used a similar process to create my little saw whet owl pictured in today’s post. Underneath all the thread work on this owl is a photograph printed on fabric. I left his bright eyes un-stitched and that’s probably why it looks so impressive.

I also ask myself that … this is all my creative work, so how is it cheating? I guess I’m remembering school day discussions of what is and isn’t art.

I took the photo of the bird at an avian rehab center I visited. I also had processed the photo, reducing some of the complexity, in Photoshop. And then I had to successfully print it on fabric. After all the prep work, it was finally time to add the stitching, which, I definitely does take a certain level of skill. After all the threadwork, I then had to complete the design by giving him/her a branch to sit on and, finally, finished it all with an interesting quilted background fabric.

My process is complex and takes a great deal of time to complete. I’ve been fine tuning my skills for many years. I think it’s Ok to sometimes doubt myself, but then I also remember why I shouldn’t. Instead of cheating, let me just call it our “little secret.”

Ok, We’re done

I’m enrolled in a class that studies archetypes in our creative lives. Archetypes are a way of viewing people (yourself) based on personality or character traits. For example, maybe you have nurturing tendencies? (Mother/father archetypes). Or maybe you like to joke around? (clown/jester archetype) Or maybe you enjoy figuring out how things work? (Engineer archetype) [note: Caroline Myss is a great resource]

Exploring your archetypes helps you understand how you work, process things and what you like to do. While developing my list of 12, I realized I have a strong Artist archetype. You may think, “Well duh? You didn’t know that?” Well…I believe I am an artist and I’m working as an artist, but I never realized how strong/innate this trait is within me. Art has always been my favorite go to activity (even at a young age). It’s something that gives me relaxation and calm.

Whenever I travel, I pack an activity bag filled with knitting and, more recently, “slow stitch” projects. I remember doing embroidery as a child, but I use to hate my hand stitching. I would say, I don’t like doing it because I didn’t sew neat and tidy (aka perfect).

A couple years ago, I stumbled on this new trend of mindful stitching and mending. I loved seeing all the pretty stitch work and clearly noticed the un-perfect approach these stitchers embraced. This recovering perfectionist had to try it. Well, I’m hooked!

It is extremely meditative to stitch the layers of scrap fabric. As I stitch, I have no plan. On a whim I’ll change direction or try a different design. It is good to have projects that don’t require perfection or planning. We all have an inner critic and sometimes that voice is stifling. We get so hung up on making things perfect that we miss the enjoyment of just doing.

If your inner critic says you can’t, then find an activity that allows you to ignore it. Slow stitch is a good place to start. Search for inspiration on the Internet using terms like: Slow stitching, boro, or mindful mending. When you start, release all expectations, tell the critic to take a hike, and start stitching. Don’t judge the work in progress, just stitch until your inner creative says “Ok, we’re done.”

Have fun!

I feel comfort knowing that life is slowly creeping back to normal. The world seems to be running more like an out of tune sports car versus an old “hit ‘n miss” tractor.” We all have been affected by this past year and life will never again be like 2019. We’ve all adapted to changes. I’m kind of liking this mask idea, because I haven’t gotten sick (knock on wood) in over a year. And, I’m also embracing the Zoom technology. Yesterday, I held my very first live Zoom class.

I’m a bit of a technical geek. In 1990’s and early 2000’s, I use to design e-commerce websites. That was a time when most people didn’t have a “personal computer” (PC) or know what the Internet was. Even with this techie background, I wasn’t ready to embrace Zoom. I spend enough time in front of the computer and I wanted to find ways to get away from it. Zoom wasn’t for me. As the shut-down continued to stop my livelihood, I knew I had to think out of my box.

I took my first Zoom class presented by my friend Jodi Ohl. She is a mixed-media painter. I love her sense of artistic whimsy, so I signed up for her class. What I discovered was live Zoom art classes can be a lot of fun. You’re not sitting there watching a boring lecture, you’re actually working along with the instructor. You’re in your own comfortable creative space and everything is within reach, including the snacks or fresh pour of coffee. Need a different color thread? … just go get one. Forgot your machine pedal? … go grab it from the other room. And bonus!! … everyone participating has front rows seats. No more, standing behind tall people during demonstrations. (YES!!) You can work along or sit and watch…You can be you!!

Yesterday, my students praised these aspects of Zoom classes and I got to see what it was like to be on the other side. When I would teach in-person, I would grab my little “kit” of supplies and go teach. I learned that my kit needed a lot more supplies. Before class, I had to produce videos that show my sewing techniques (which eliminates many uncontrollable levels of chaos sewing live). I needed more step-out examples to demonstrate my processes and I needed to plan ahead to get class handouts to the students. And I had to get comfortable with all the new equipment, lighting, computers, cameras and software.

I was apprehensive at first, but I realized I liked the process. During class, I forgot I was in my room alone. We chatted and shared stories. They worked on their projects and I anxiously waited to see their progress (unlike in-person classes you can’t see what someone is doing on their sewing machine). BTW, everyone did great!

My follow-up verdict is I’m going to continue doing this. And, if you find you’re missing taking classes, check with your favorite artists and see if they’re teaching online; enroll if it fits. I bet you’ll have fun!


Join my email list and be the first to know about upcoming classes.

Stuck when creating

As I mentioned last week, I don’t work with a 
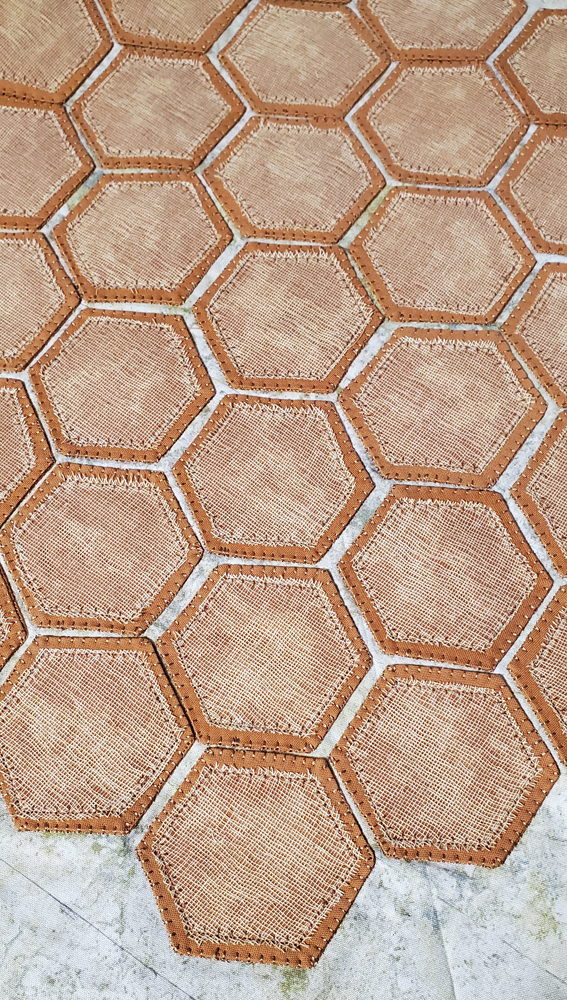
real “plan.” Maybe that’s good, maybe not. I have a vision or idea, and start working with stops and starts along the way. The following description is an insight to my creative process.

Over the past week, I attached the hexis to my background fabric and created an applique element that will go on top (you’ll see that next week). When I auditioned the applique on the hexis, it looked flat. There was no pop or interest and the applique didn’t stand out.

So, I auditioned some fabrics that I could lay in the center of the hexagons to give it a dimensional appearance. I found a loosely woven material in my stash, laid it on top of the design and stitched around each hexi shape. Then, I cut away the excess material. Tedious.

While I was stitching I noticed the there was a little pocket between the two layers of fabrics. I didn’t like that. I thought, I “should have!!” put Mystifuse on the back of the woven fabric. Then after stitching, I could iron it to adhere it in place. The problem … I didn’t use Mystifuse. Grumbling to myself, I kept on going.

As I continued to work, I thought about … “matte mediums.” I think of mediums as akin to Mod Podge but of higher quality. Mediums are acrylic liquids that can be used by artists to adhere collage material or used to thin acrylic paints. The word matte means there’s no sheen. If you wanted a shine, you would use a gloss medium.

Once the woven cloth was stitched in place and the excess removed, I then “painted” it with matte medium. This not only adheres the 2 layers of cloth, but also stops the woven cloth from unraveling. I succeeded with my vision and I’m ready for the next steps.

Although some people map out their plan, I like the challenge of not knowing. The vision drives me. Most of the time I can work around the obstacles. Usually what saves me is my arsenal of ideas. Mediums are not something quilters usually keep on hand, but other artists do. Because I have exposed myself to many different art techniques, my “toolbox of ideas” is full. And, my stash of supplies is diverse. Classes are a great way to learn new things.

I encourage you to take classes and experiment. Don’t be disheartened if you take a class and find you’re not good at it. You will likely always learn something new when you take a class. Understanding what you like and don’t like is part of the learning process. The more you learn, the more options you have. The bigger the tool box, the less likely you’ll ever truly feel stuck when creating.