Category: Experiments

Waiting for some realism

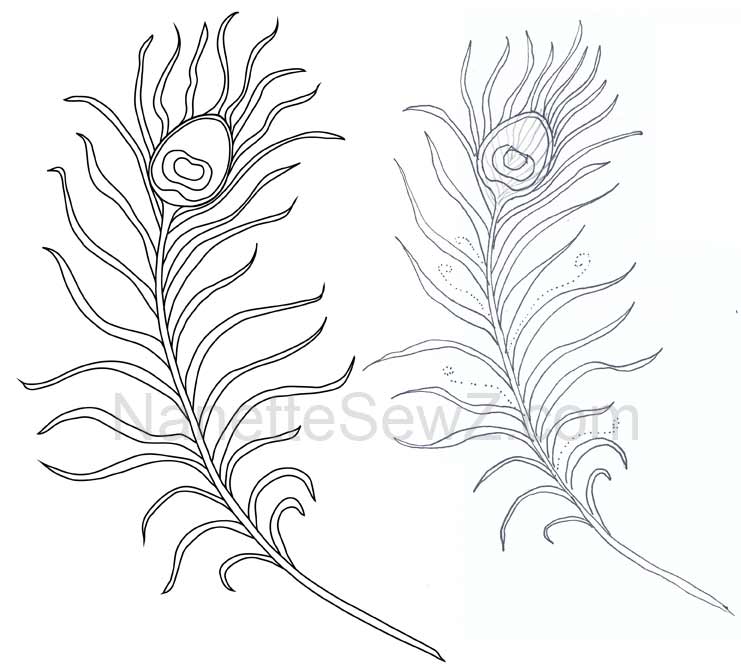
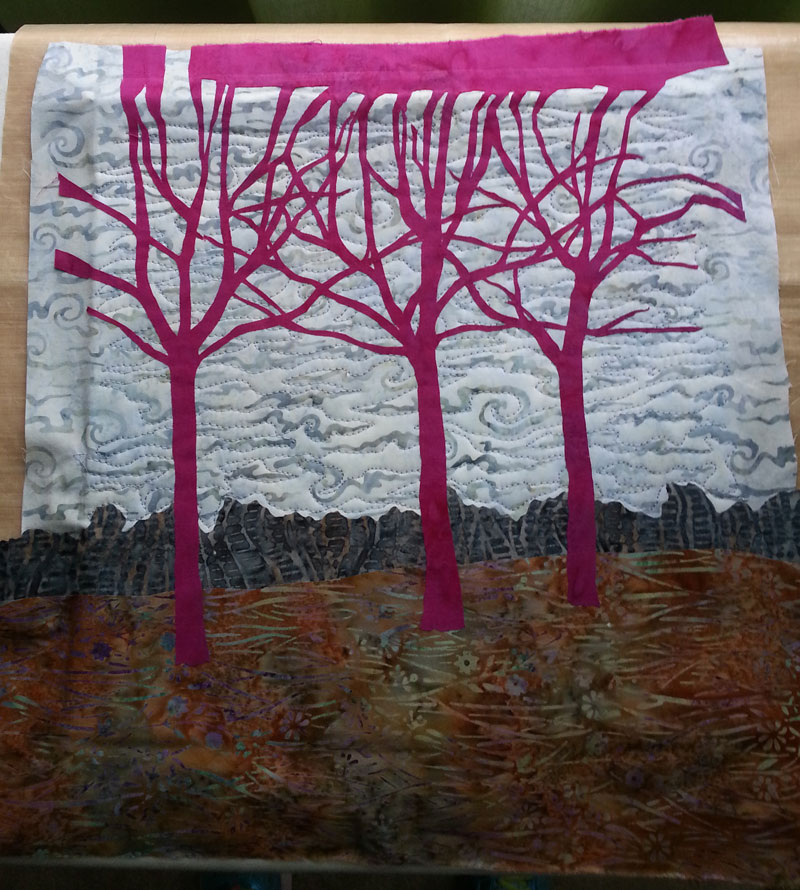
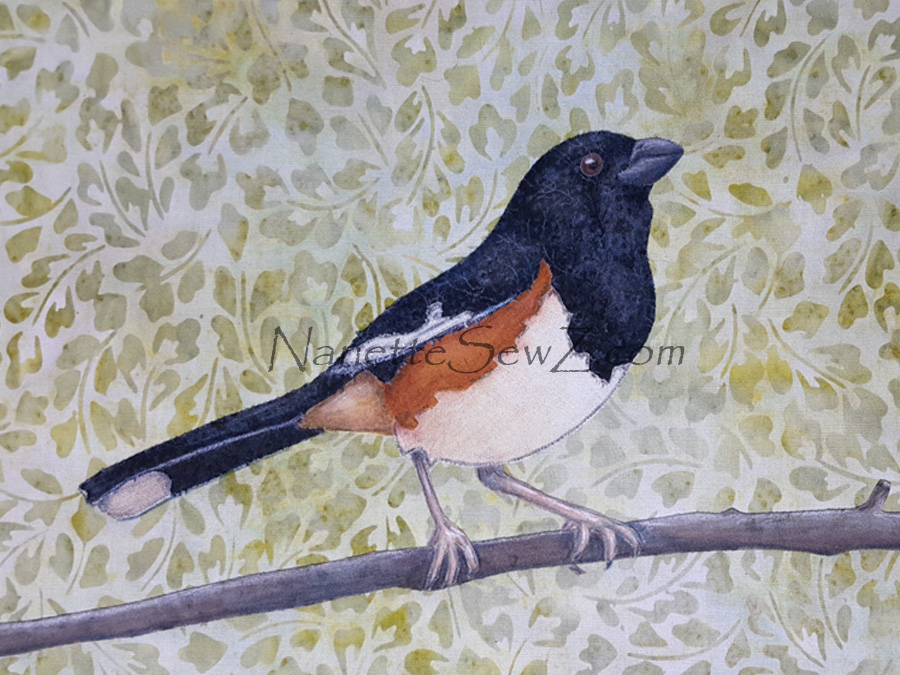
On October 25, I posted a photo of my Eastern Towhee in progress. I start with a basic line drawing which I use to cut out the fabric pieces and fuse them to my background fabric. I hinted that there was more to the process. Today I’m going to share that with you.

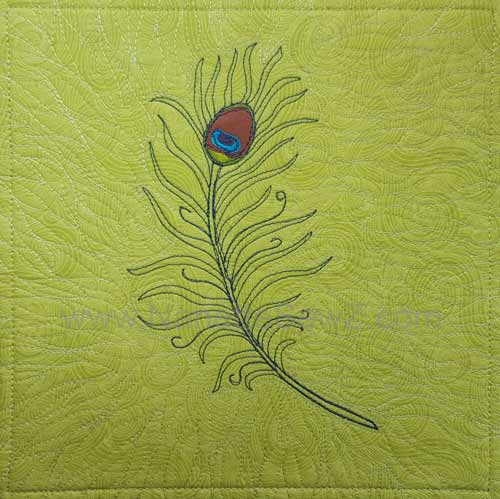
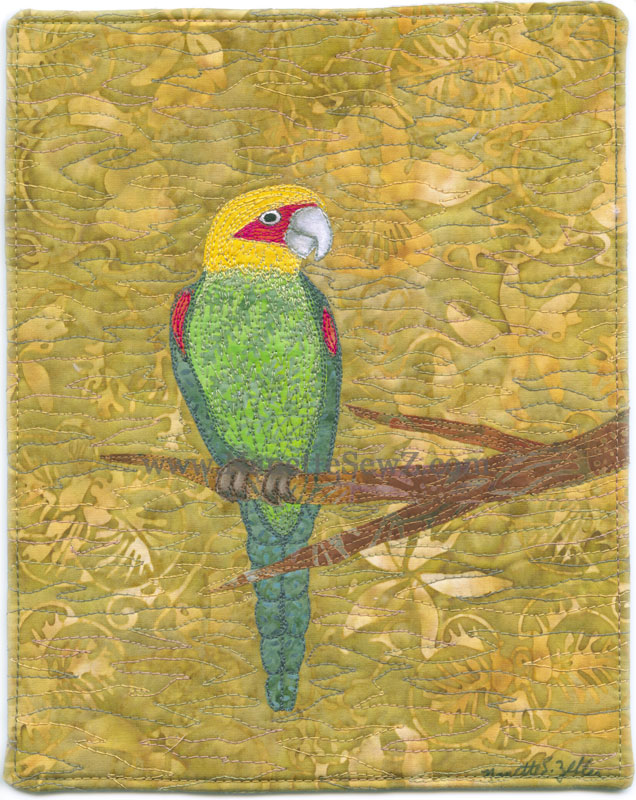
The one thing I’ve noticed about most fusible applique techniques is that the pieces look flat and cartoon-ish. I’m far from being a realist in my artistic style, but I do crave more realism in my work. In life, objects aren’t 2-dimensional, they reflect light and shadows. That’s what I want to see in my design.

A few years ago, on a whim, I decided to take a Prismacolor pencil drawing class from a local artist and friend, Frank Pierce. I enjoyed the class, but didn’t think I’d every use what I learned. Then, I had the ah-ha moment of, “I wonder if I could use the pencils on fabric?” That started me on a mission of exploration. These colored pencils gave me a tool to add the shading I was looking for. But as with any discovering, I realized there was more to it than just coloring. If you want to know more about my specific process, then you might want to pick up a copy of the Dec17/Jan18 Quilting Arts magazine. There’s an article in there where I explain the techniques I use. I’m pretty excited about the possibilities of using these pencils in my art.

This little bird still isn’t finished. There’s some stitching that needs to get done, but I’ll share that later because right now I have another bird in the works waiting for some realism.

.

.

.

.

See my work and discover my process of “Creating Highlights & Shadows
Quilting Arts Magazine
December 2017/January 2018
available book stores or online at Interweave Press

Stop playing

No matter how accomplished you get in doing something, I believe there is always room for improvement and growth. Maybe some people can admit that they’ve reached the pinnacle. Not me.

The world is constantly changing. People’s interests change, fashion changes, and new technologies are created. If I could say I have it all together, I suspect in a few months…maybe a year…what I do would become out-dated, old, and uninteresting.

So my issue is to keep figuring things out. It’s a difficult process, because you can never stop, even if you get tired. My feelings right now are I need to improve my quilting skills.

I have a fancy machine, but that doesn’t do the work…my hands and brain do. Lately, I’ve noticed that when I quilt my pieces I fall back into what’s comfortable. I’m bored.

Recently what has wowed me in other quilts is the beautiful mixture of different motifs on one quilt. The backgrounds are rich with varying designs. That’s what I’m loving and want to do. I’ve been trying to think what’s holding me back and I realize its time. I don’t allow myself time to play … play feeds inspiration. Play also allows you to try something new without worrying about failure; “Oh well, I was just playing.”

This week I played. The results aren’t typical for me, but I was able to experiment with some new designs. Then, because that wasn’t special enough, I experimented with Derwerts Inktense pencils to add some color. I won’t show you the fails, just know that there were a few.

My take home message from this is to allow yourself time to play and experiment. You don’t have to be so serious about everything you do. Just remember as this applies to our art: “we don’t stop playing because we get old, we get old because we stop playing.”

Continue to experiment

As promised, here is the peacock feather I was working on in my last post. During the process of rendering my design into fabric, I found that my stabilizer didn’t work as well as I had hoped.

What’s interesting is that there are so many variations to creating thread sketched pieces. I have options to finding something that works better. I don’t usually put backing fabrics on my pieces when I thread-sketch/paint. Sometimes the backside of my art quilts look messy, so adding the backing after the fact hides some of the ugly. I do use some sort of stabilizer which helps keep the fabric from shrinking up too much when you add the layers of stitches.

On this particular piece I used fusible fleece batting as the stabilizer. I don’t think I ever tried using fusible fleece before. What I realized is that this brand of fusible fleece is acrylic and the more I stitched the more grip (resistance) it created on the sewing machine bed. It was almost like the acrylic fibers were melting a bit from the friction. When you free-motion stitch, your fabrics need to move smoothly under the needle. If they don’t, you’re stitch lines won’t look as fluid. I’m happy with the final piece and I’m ready to ship it off to its new owner. This is, however, a reminder that there’s always lessons to learn and I should continue to experiment.

Fabric and thread

This week, I’m working on a process to demonstrate thread sketching. Thread sketching is just like making a sketch with pencil and paper. Sketches are pretty quick and often made of simple lines. Instead of paper and pencil, I’m using a sewing machine and thread to sketch.

I want my example to be reproducible, so I need to start with an image. For this example, I decided to use  a peacock feather as inspiration. I initially drew the design on paper (right) and I probably could have just made copies, but it looks a little sloppy from all my erasing and redrawing. To clean things up, I scanned the drawing into my computer and re-drew it using Adobe Illustrator (left). The line drawings I can make in Illustrator are known as vector graphics. I like working with vector graphics because they can easily be re-sized and changed without effecting the quality of the image itself. If I tried to enlarge the scan, the image would get more blurry the larger I made it. With vector graphics, I can enlarge or shrink the image as much as I want and have the same quality for all projects. I can also tweak the image to change how it looks.  It definitely is a bit time consuming, but since I plan to reuse the image for several projects, I feel it’s worth my time in the long run.

Stay tuned, because next time you see this it will be rendered in fabric and thread.


This one may take awhile

A part of creating original designs is figuring out how to accomplish them. I always say I have a huge tool box [of ideas and resources] I can use for my art. The ideas don’t always work as planned. Its OK, because sometimes it works out and sometimes it doesn’t.

Right now, I have an idea that’s pretty solid in my head.  I want to create an art quilt using a photo I took at Muir Woods. First I need to make the background. I want it to appear as if the sun is beaming through the trees. I want to use pieced wedges of fabrics. Brilliant idea … I “think.”

Well the bugger is I don’t have a lot of yellow fabric. So, I went shopping at NC Quilt Symposium 2 weeks ago. They usually have some great vendors … not so this year. Sadness.

So, then I decide to use what’s already in my stash and make it work. Yes… Yes… I think I can do this. I spent an entire day cutting, piecing and sewing (remember I’m not using a pattern). I’m confident its looking good … but … not … so … fast. The final outcome failed. More sadness. The piece is not large enough to cut square and get the effect I desired. I don’t have enough yellow fabric to try again. The nearest fabric store is an hour away. With this “trial” run, I’m sure the idea will work, but I’m stuck until I can get out of town and go fabric shopping. Even then, there’s no guarantee that the store’s fabric selection will work with my idea.

I’m not defeated…just feeling challenged at the moment. I will get this one done, but for now its on hold. Sometimes that’s just the way it goes … this one may take awhile.

Let the left foot drive

When I purchased my HandiQuilter Sweet16, the salesclerk at one of the shops was rather insistent that I purchase their $1k stitch regulator. I insisted I didn’t need it and today I still agree. Want to know why?

Somewhere along my journey, I was taught to sew with my left foot and without shoes. Most everyone drives a car using their right foot on the gas and I am right-handed, so you’d think using my right foot would be the most comfortable way to control the foot pedal. And barefoot, why would that better?

First, let me explain the sewing process. The secret to consistent stitch length is to move the fabric in sync with the needle. The more “gas” you give the machine with the foot pedal, the faster the needle moves up and down. The faster the needle moves, the faster the fabric needs to move to keep in sync with the needle. When sewing pieces of fabrics together, it is the machine’s feed dogs that move the fabric. In free-motion quilting, however, the feed dogs are not engaged. The only thing moving the fabric is the sewist.

Free motion quilting becomes much like a dance, where your hands and feet need to work in harmony to keep the stitch length consistent. For people who have the extra $1k to buy a stitch regulator, they are paying for the luxury of having the machine control the process (much like a self-driving car). These regulators can sense movement of the fabric. The faster the fabric moves, the faster the needle goes…it doesn’t matter what you’re doing with the pedal.

Since I’ve sewn and driven right-footed for several decades, you would think my right foot could handle the job. In reality, my right foot knew too much. Piecing fabric and driving a car is different from free motion quilting. While I was learning to quilt, I literally had to re-train myself to sync my hands with my feet. It was a struggle. My right foot had strong muscle memory and knew “pedal to the metal”; my hands couldn’t keep up. In contrast, my left foot never had this kind of responsibility and didn’t “know” how to sew. By switching to my left foot, I no longer had to fight my old habits and I trained my left foot to control the gas. Sure it was awkward at first, but I quickly got the hang of it.

And why am I bare footed? In general, we wear shoes to protect our feet from sharp objects. The thicker the shoe, the less our feet “feel” the surface we’re walking on. When I’m shoe-less I have greater control of the pedal, because I can sense how much pressure I’m applying. Shoes barricade this sensation.

So, if you want to gain more control of your sewing, I suggest getting comfy, take off those shoes, and let the left foot drive.


Stay tuned

Carolina ParakeetLast week I mentioned that I had been working on a few pieces that were experimental play, where I could focus on a specific technique and work out the bugs.  I have another one to show you.

Awhile back, I posted sketches for a quilt I was planning to make (see the story here). I took the sketches and used them as templates to make fabric birds. Although the fabric birds have been done for awhile, I was hesitant to move forward with my idea. I have never thread painted birds and I wasn’t sure how that would work out. If I composed the design on a large (finished-sized) background and then did my thread work, I would be in a world of hurt if I messed things up (that dreaded point of no return again). I was intimidated to move forward until I finally figured out how to get past this hurdle. Then I got an idea…

I am involved in a monthly mixed-media art exchange with 10 other artists. The intent is for each of us to create a book of artwork. We each submitted guidelines on what we wanted for our books, e.g., theme and page size/orientation. The challenge coordinator gave us a schedule of who we will be creating a book page for each month. Then, every month for ten months, I create a piece for someone and someone creates a piece for me. It’s fun!

For May, my artist had a theme of “birds,” size 8″x10″, and vertical orientation. Ah-Ha! Since my birds were the right size,  I could test my thread painting technique on Leni’s page. Yep, I used this small quilt to help me gain confidence to proceed with the larger quilt.

I am pleased with the results. Currently, I’m auditioning backgrounds for the large quilt where 7 happy Carolina Parakeets will be hanging out. Things won’t be exactly the same on the larger quilt, but testing the technique allowed me to know what will and won’t work on a larger scale. Stay tuned…


It’s a win-win process

I’m trying to get into the swing of things. In some respects, it seems like I’m just playing around. Tcrepe myrtleshe last couple of weeks I’ve been working on smaller pieces that had other purposes. I have to keep reminding myself that I’m not wasting time.

A friend of mine told me how she always made a smaller version of her work before she tackled the bigger quilts. For most of my projects, the components can get very small, even on a large scale art quilt. I couldn’t imagine rendering the image down smaller than they already are. The pieces would just be too teeny to work with.

The pieces I’ve “played” with the last couple weeks are like technique snapshots. I am experimenting with different techniques to see how the process would work on a larger scale. Happily, I have had several “ah-ha” moments.

It’s always kind of scary to make art using cloth. In the early stages of development, you can rip things out and start over. But, as you add more and more layers of fabrics and thread, the point of no return becomes really obvious. Painters can scrap an entire canvas by slapping a coat of gesso on it, then start over. Textile artists don’t have that luxury, the materials are usually lost. If we’re lucky they can be re-purposed, but frequently they’re only worthy of the trash. Starting over is also risky because you may not have any more of the precious “sky” fabric that worked so well the first round. We must do every thing we can to avoid disaster, because there’s no going back.

That’s why, testing out a technique is important. If I can get a technique down on a small project, it makes my attempts on the big project more likely to succeed.

Last week, I explained one experiment I had with the Cameo Silhouette. While working through that process, I created a piece called “Crepe Myrtles” (click here to read about the process).  I sent it to SAQA (Studio Art Quilt Associates — www.saqa.com ) this week to use for their annual benefit auction (fyi- you’ll be able to bid on it this fall). You see, I wasn’t wasting time. I was learning and exercising my creative muscles. And in the end, it’s a win-win process for me, SAQA and maybe you if you plan to bid on it.

Tools in my toolbox

silhouetteLast year I was working on an art quilt that required a lot of intricate cutting (you can see it on my home page – www.nanettesewz.com ). I couldn’t find scissors sharp enough to make the tiny cuts, so it took a long time to remove all the unwanted fabric. Before I could even cut the fabric, I had to draw the design onto paper and then trace it to my cloth. Tedious, to say the least. I was talking (actually kind of whining about it) to the owner at my LQS and he told me about the Cameo Silhouette.

The Silhouette is a plotter similar to what engineers use, but a home version made for crafters. It allows me to send a line drawing from my computer into the plotter.  From there the machine can “draw” the lines for me. The lines can be made using a variety of tools from pens, embossers, or cutting blades. I bought the machine for its cutting possibilities.silhouette_trio

myrtletrioMy first attempts at cutting didn’t go well and I was quite frustrated. I knew I needed a significant amount of time to figure things out, but couldn’t find the time to devote to it. Over a year after buying the machine, I found time this week. Following a couple of hours of fiddling with the computer software, my fabric and cutting blades, I finally figured out my major issues: 1) use the correct fusible stabilizer and 2) use a sharp cutting blade!!! Magic!

Just to prove the point that it would work for me, I’m remaking the quilt that got me started on this mission. In the photos you’ll see the tiny little cuts that were made by my Silhouette as it outlined the lines of my tree branch drawing onto my batik fabric. When the machine was finished tracing the lines using the cutting blade, all I had to do was remove the unwanted pieces of fabric. Amazing! I’m pretty excited about this. Just one more tool in my toolbox.

Happy New Year

cherry blossoms Every year at this time, I reflect on what I’ve accomplished and where I’m heading. The new year is a good time to do this type of inventory, because there’s a virtual line between old and new. Say goodbye to the old and hello to the new, so to speak. In reality time is just one continual blur, Camelliaso any date could be used as a reflection point. Deliberately or not, I always tend to reflect more at this time of year.

Looking back, I really did a lot this past year. I produced 2 art exhibits, entered several shows, and applied for and received a grant. I spent a lot of time last year helping others on their journey. I’ve learned a lot.

This year, it’s time to work on me. It’s time to put the energy into my own artwork as I get ready for an exhibit in November 2016. I realize I’m easily distracted  [dutifully noted, as I just spent 2 hours working on my website]. I find it easy to help other people, but find avoidance in my own productivity. This is going to change this coming year. I’ve been clearing my plate of many things so that I can find more studio time.

OMossne thing that I’ve been doing the last couple months is search for creative inspiration. Every day, I try to look for and photograph things that inspire me. I tend to find the most beauty in the natural world. I enjoy seeing the color pallets that naturally occur around me. The form, structure, and design created in nature is pretty amazing too.

When I can’t be in the studio, these photographic essays are a way for me to entertain my creative sprite. They also inspire me with ideas for my art. I’m not sure how all the images fit, but having them in my “library” will prove to be a great resource when they’re needed.

It will be interesting to see how this next year advances. Right now,  I don’t have many hard core plans yet, but that’s what January is form…thinking and dreaming about what I’ll make of 2016. As always, I’m looking forward to a new year and I hope you are too!

Happy New Year!